Sorry, for being absent so long. The Mamebook project has been dormant for a while due to a crashed hard drive... Anyways, in the meantime I thought I'd answer some of your questions:
Q: I purchased a Ramvik after reading your blog and I put it together. Now that I see the table all together, I am wondering how your drawer is sliding in-out so easily without bumping into the laptop mounted underneath? Did you cut the back of the drawer out to make room?
A: Yes, that's correct, You have to cut away the back of the drawer to allow it to slide out properly.
Q: As I'm still in the planning fase advice and suggestions are most welcome! One question: what's the size of your macbook screen?
A: The MacBook screen is 15".
Q: I would love to post you Mamebook on http://www.wawerko.de, a german DIY-Website. It definitely rocks! May I?
A: Go ahead!
I've gotten an amazing response for this project, thanks everone!
Monday, November 17, 2008
Friday, July 18, 2008
FAQ
Q: Do you have more information on the joystick you are using? And how you hacked it to work?
Thanks. Darthdaddy.
A: Since the Mamebook was done on a whim, I only used stuff I got at home that required little or no hacking. I didn't want to bother with I-pac and wiring so I decided to use one of my old Namco Arcade Sticks and a simple PSX-USB adapter. I also used USB Overdrive to sort out the mapping. Piece of cake!
Thursday, July 17, 2008
Control panel
Saturday, July 5, 2008
Sunday, February 24, 2008
Control Panel construction (cont)
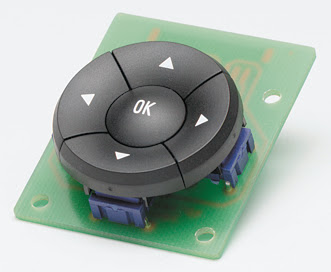
Mounting the Namco joystick onto the drawer has one drawback, I'm loosing four buttons. I set them up to handle coin and P1 start as well as ESC (to exit back to the front end) and TAB (to make changes inside MAME OSX. I have a few options here, the first is to drill holes in the drawer and just add ordinary pushbuttons to replace them but I'm not to fond of that idea. Instead I've been looking at some other options.


1) Navimec navigation buttons:

I really like this one for frontend navigation but it doesn't make sense in-game where I need insert credit and start buttons.
2) Art Lebedev's Optimus Mini Three:

This is more interesting but also more expensive. Since the keys are actually tiny monitors the images inside the buttons can change. This means I can have up, down and select buttons for the front end and Insert credit, start and ESC buttons for MAME. Also, it will probably look amazing with some nice artwork. The downside is that I need to add a USB hub and, of course, the price...
Thursday, February 21, 2008
Time out
Vertical vs horisontal

The reason I went for a vertical screen had simply to do with the viewing angle. Usually laptop screens have a wider viewing angle from the sides than from the front. Since the screen will be on a flat surface it works best vertically. Also, since I want to play mostly vertical games like Donkey Kong and Pac Man this suits me fine!
Wednesday, February 20, 2008
Plastic smoke
Control panel construction

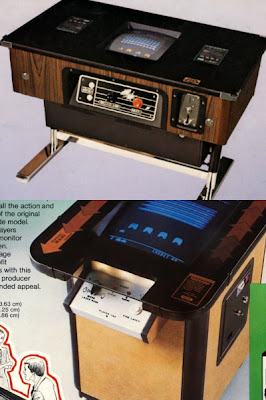
Researching different types of cocktail cabinet control panels I decided to go for a classic vertical mount instead. The joystick will be mounted into the front of the drawer, this time by a professional carpenter. So, stay posted, this will probably be ready beginning next week.
Below are two types of classic control panels, I will go for the top one but at 90°. A protruding control panel will destroy the look of the cabinet so I wanted to try this first. I can always adjust the angle later.

Control panel construction
Control panel construction
Tuesday, February 19, 2008
Speakers

The weak built in Powerbook speakers will be replaced with Labtec Pulse 285 2.1 speakers. I choose the Labtec for several reasons, they were the cheapest, the subwoofer is small enough to be built into the top of the Ramvik, out of view and last but not least, it has a wired volume control for easy to reach volume adjustments. The satellite speakers will be mounted inside the control panel that is to replace the drawer.
Todo
I have a few things I want to do before I consider this to be finished.
1) Smoke coloured PVC foil between the glass and the bezel.
2) Speakers
3) A proper control panel
4) Select a few vertical games that work well.
5) Play!
Sunday, February 17, 2008
Ramvik
Saturday, January 19, 2008
How to build your own Mamebook (continued)
1) For this step, you need a Ramvik side table from IKEA. Before assembly, take the top shelf, and make the necessary measurements for the hole where the Powerbook will sit. Allow for some extra space for cables:

2) Once the hole is made, check that everything fits. The hole will be covered later with a bezel so don't worry too much about looks at this point.
3) Since the Powerbook is thicker than the shelf I added spacers to make the screen flush with the top.
4) Here, Ramvik is almost finished and you can see how thin the Powerbook really is. It's merely 9 mm thicker than the shelf. The bezel and glass in in place here as well. The bezel is made out of 160 g black paper. Be sure to get the kind that's dyed through, otherwise you'll end up with white lines where you make the cuts.
I just connected a Namco PSX Arcade stick with a USB adapter and put it inside the drawer. Coming up; replacing the drawer with a proper control panel. Stay posted!
Friday, January 18, 2008
Games
Subscribe to:
Posts (Atom)


